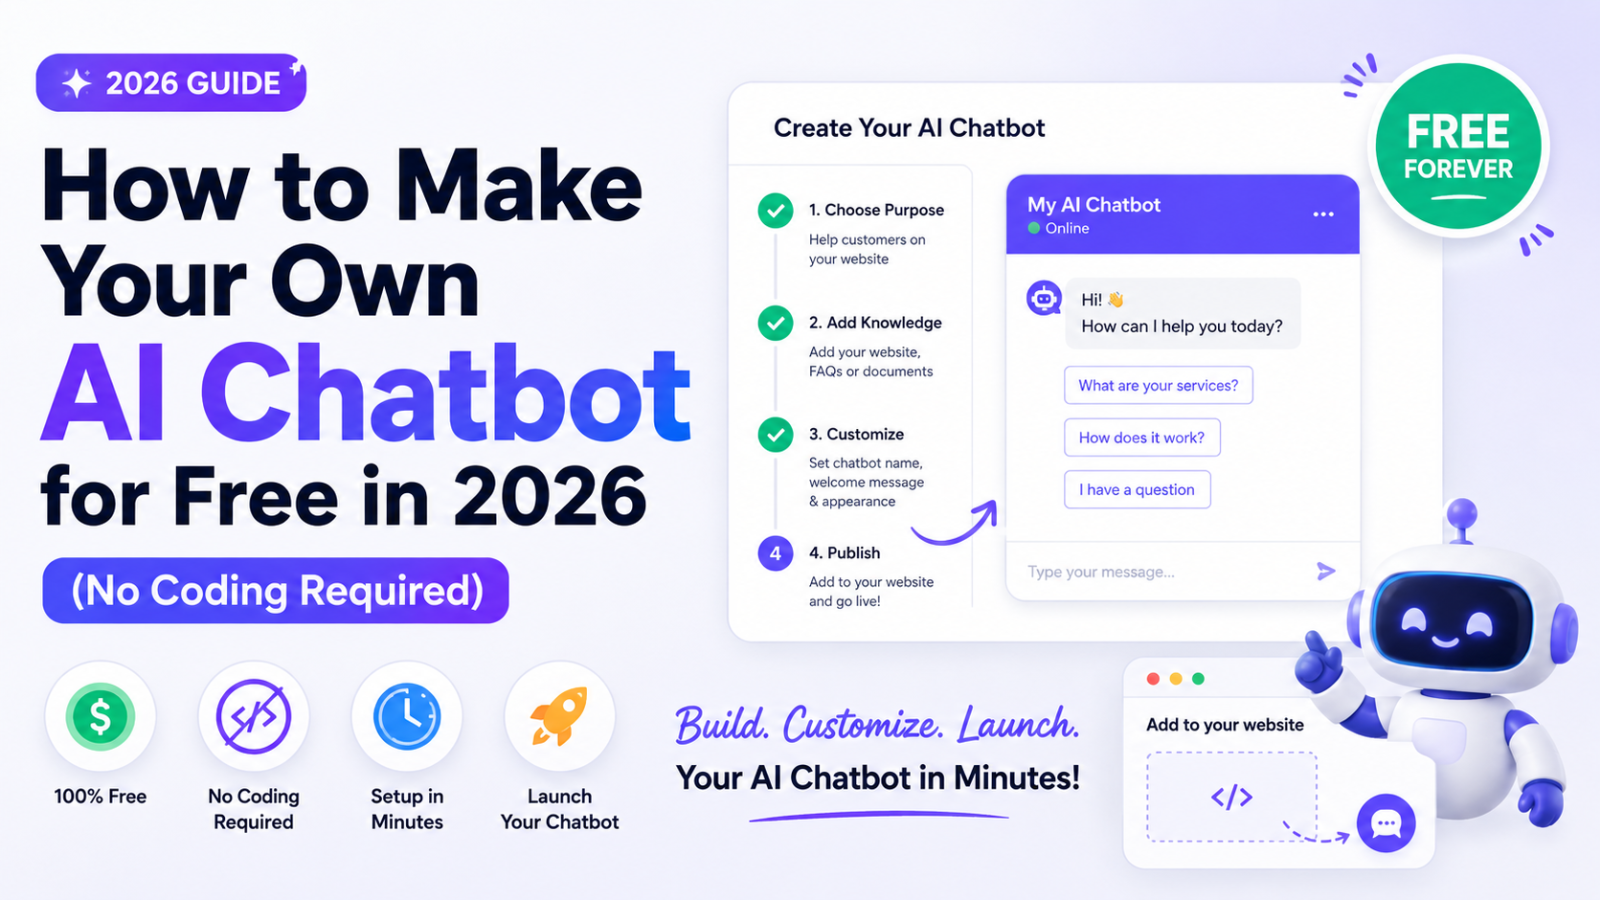
How to Make Your Own AI Chatbot for Free in 2026 (No Coding Required)
Learn exactly how to make your own AI chatbot for free in 2026 — step by step, no coding needed. Train it on your business content and go live in under 30 minutes with Glanceia.
Introduction
Three years ago, building your own AI chatbot meant hiring a development team, spending $15,000 to $150,000, and waiting months for something to go live. Today, you can make your own AI chatbot for free in under 30 minutes — trained on your specific business content, live on your website, answering visitor questions accurately 24/7 — without writing a single line of code.
Building an AI chatbot used to require a team of developers and months of work. Not anymore. In 2026, you can build a custom AI chatbot in under 10 minutes without writing a single line of code. No technical background needed. No expensive development team. Just a clear goal and the right platform.
This guide is the most practical, step-by-step resource available for making your own AI chatbot for free in 2026. By the end you will have a working, trained AI chatbot ready to deploy on your website — at zero cost.
Two Ways to Make an AI Chatbot: Choose the Right Approach First
Before jumping into the steps, understand that there are two fundamentally different ways to make an AI chatbot. Choosing the wrong one wastes time.
Approach 1: No-Code AI Chatbot Builder (Recommended for 99% of businesses)
A no-code chatbot builder lets you create, train, and deploy an AI chatbot entirely through a visual dashboard — no programming, no API setup, no server infrastructure. You upload your content, customise the widget, and get an embed code. Done.
Cost: Free to start — paid plans typically from $9 to $50/month Time to go live: 20 to 60 minutes Technical skill needed: None — if you can use Google Docs, you can do this Best for: Small businesses, service providers, ecommerce stores, agencies, solopreneurs
This is the approach this guide covers — and specifically using Glanceia, the best free no-code AI chatbot builder for small business websites in 2026.
Approach 2: Custom Code / API Build (For developers and enterprise teams)
Building directly on the OpenAI or Anthropic API means writing code that calls the AI, managing infrastructure, handling conversation state, building your own widget, and maintaining everything yourself.
Custom development costs $15,000 to $150,000+ depending on complexity, plus ongoing maintenance costs — requiring a development team and 3 to 6 months of build time. API-only builds using OpenAI or Anthropic cost $2 to $15 per million tokens plus hosting and infrastructure.
Skip this approach unless you are a developer building a chatbot as a product feature or have enterprise-specific requirements that no existing tool can meet. For any small business that just wants a chatbot on their website — stick with Approach 1.
What You Need Before You Start
Making your own AI chatbot for free requires almost nothing. Here is the complete list:
A computer with internet access
A free Glanceia account (no credit card needed)
Your business content in any format — PDF, Word doc, plain text, or a webpage
20 to 30 minutes
That is it. No coding knowledge. No hosting. No technical setup.
Step 1: Define Exactly What Your Chatbot Should Do
Building a chatbot starts with defining a clear scope and purpose, which guides every other decision — platform selection, training content, and feature requirements.
Before you open a single tool, spend five minutes answering these three questions:
Question 1: What problem will your chatbot solve? Be specific. "Answer customer questions" is too vague. "Answer pricing, service, and FAQ questions so visitors do not leave without getting information" is a real purpose. Common purposes for small business chatbots:
Answer FAQ and support questions instantly 24/7
Capture visitor leads automatically (name, email, phone)
Qualify leads before your sales team calls them
Handle pre-booking or pre-purchase inquiries after hours
Reduce the repetitive support emails your team receives daily
Question 2: Who will be talking to it? Website visitors who are potential customers? Existing customers with support questions? Both? The answer affects how you write your welcome message and what content you train the chatbot on.
Question 3: What should it do when it cannot answer something? Every chatbot has limits. Decide upfront what happens when a visitor asks something the chatbot cannot handle — it should always provide a clear next step (your email, your WhatsApp, a link to book a call) rather than leaving the visitor with a dead end.
Write the answers down. You will use them in the next steps.
Step 2: Sign Up for Glanceia Free
Go to Glanceia and create a free account. The process takes about 60 seconds:
Enter your name and email
Set a password
Confirm your email address
You are inside the dashboard
No credit card required. The free plan is fully functional — not a 14-day trial, not a feature-limited demo. You can build, train, and go live on the free plan without ever entering payment details.
Step 3: Create Your Chatbot
Inside the Glanceia dashboard, start a new chatbot. You will be asked for:
Chatbot name Use your business name, a product name, or a simple functional label like "Support" or "Ask Us." This name appears in the header of the chat window on your website.
Default language Set this to match your website's primary language. If you serve visitors in multiple languages, Glanceia can handle multilingual conversations.
Tone and personality Choose how you want the chatbot to sound — professional, friendly, conversational, formal. Match this to your brand voice. A law firm and a travel agency should sound different.
Step 4: Build Your Knowledge Base — The Most Important Step
This is what determines whether your AI chatbot is genuinely useful or frustratingly vague. The more relevant information you provide, the better your chatbot will perform. Your chatbot is only as good as the data it learns from.
Think of the knowledge base as the brain of your chatbot. Everything you upload becomes the information it can draw on when answering visitor questions.
What to Upload
Your FAQ document This is the single highest-impact piece of content you can give the chatbot. Write out every question your team answers repeatedly — by phone, email, WhatsApp, or in person — and answer each one specifically and completely.
A good FAQ entry looks like this:
Q: What is your cancellation policy?
A: You can cancel any order within 24 hours of purchase for a full refund.
After 24 hours, cancellations are accepted up to 7 days before the delivery
date for a 50% refund. After that point, we are unable to process refunds.
To cancel, email us at support@yourbusiness.com with your order number.
A bad FAQ entry that will make your chatbot useless:
Q: What is your cancellation policy?
A: Please contact us for more information.
Specific answers produce specific chatbot responses. Vague answers produce vague chatbot responses.
Service or product descriptions What do you offer, what is included, what is not, what is the difference between your options? Upload the full details — not marketing copy, but the practical information a buyer needs to make a decision.
Pricing information Pricing questions are among the most common that visitors ask. Give the chatbot accurate pricing information — even if it is a range — so it can answer instead of deflecting. A chatbot that says "pricing varies, please contact us" for every pricing question is not useful.
Policies Refund policy, return policy, cancellation terms, shipping times, booking requirements, warranty information — any policy a visitor might ask about before deciding to purchase or contact you.
About your business A brief description of what your business does, who you serve, how long you have been operating, and what makes you different. Visitors sometimes ask open-ended questions like "what do you do?" and the chatbot should answer confidently.
Contact and location details Business hours, phone number, email, physical address if applicable, service area. Essential for local businesses.
How to Upload
Glanceia accepts content in multiple formats:
PDF upload — drag and drop any PDF directly into the training section
Text paste — copy and paste content from any document
URL — link to a live webpage and Glanceia reads it automatically
Upload as much relevant content as you have. The more quality information you provide, the better your chatbot performs. Focus on content that answers common customer questions about your business.
Step 5: Customise Your Chatbot's Appearance
Your AI chatbot should feel like a natural part of your website — not like a generic third-party widget.
In the Glanceia dashboard, customise:
Widget color Match your brand's primary color exactly. Use the hex code from your brand style guide if you have one.
Welcome message Write the opening message visitors see when the chatbot appears. This is crucial — a good welcome message immediately tells visitors what the chatbot can help with and invites engagement.
Good examples by business type:
Service business: "Hi! Questions about our services, pricing, or getting started? Ask me anything — I can answer right now."
Ecommerce store: "Hello! Looking for something specific or have a question about an order? I'm here to help."
Travel business: "Hi! Planning a trip or want to know about our packages? Tell me where you want to go."
Healthcare or clinic: "Hello! Have questions about our services or want to book an appointment? I can help."
Restaurant: "Hi! Want to know about our menu, hours, or reservations? Just ask!"
Widget position Keep this at bottom right — it is where visitors instinctively look for a chat widget and where engagement rates are highest.
Lead capture fields Configure what information the chatbot asks visitors to provide. At minimum, set it to collect name and email. Depending on your business, you might also collect phone number, project type, budget range, or preferred appointment date.
Step 6: Test Your Chatbot Thoroughly
Before adding the chatbot to your website, test it inside the Glanceia dashboard by asking it real questions — the same ones visitors and customers typically ask you.
Test for:
Accuracy — Does it answer questions correctly and specifically from your uploaded content?
Coverage — Ask questions from every category you uploaded. If it gives a vague or incorrect answer, the content in that area needs to be improved or expanded.
Edge cases — Ask something it definitely does not know the answer to. Does it acknowledge the limit gracefully and provide a useful next step, or does it give a confusing non-answer?
Tone consistency — Does every response sound like your brand? Is it consistent throughout a multi-turn conversation?
Lead capture — Does the lead collection trigger at the right moment in the conversation?
Fix anything that does not perform well by going back to your knowledge base content and improving the relevant section. This is the most valuable time you will spend — a well-tested chatbot converts significantly better than one deployed immediately after setup.
Step 7: Add Your AI Chatbot to Your Website
Once your chatbot is trained and tested, Glanceia generates a single embed script — one line of JavaScript. This is the only technical step in the entire process, and it takes about 60 seconds.
What the embed script looks like:
html
<script src="https://cdn.glanceia.com/widget.js" data-id="YOUR_CHATBOT_ID" async></script>Copy this script and add it to your website using the method for your platform:
WordPress: Install the free WPCode plugin → go to Settings → Insert Headers and Footers → paste in the Footer Scripts box → Save
Wix: Settings → Custom Code → Add Custom Code → paste script → set to All Pages, Body-end → Apply → Publish
Webflow: Project Settings → Custom Code → Footer Code → paste script → Save → Publish
Shopify: Online Store → Themes → Edit Code → theme.liquid → paste just before </body> → Save
Any HTML website: Open your HTML file → find the closing </body> tag → paste the script just before it → Save and upload
For detailed platform-specific walkthroughs:
Step 8: Verify It Is Live and Working
After publishing your website with the embed script, open your site in a private or incognito browser window. You should see the Glanceia chat widget in the bottom right corner.
Test it again from a visitor's perspective — ask your most common questions, see how the lead capture flows, and check that it looks and works correctly on mobile. Mobile testing is especially important since a large share of website traffic comes from phones.
If the chatbot is not appearing, the most common reason is not publishing after pasting the script (especially on Wix and Webflow, which require an explicit publish step).
Step 9: Improve Your Chatbot Over Time
Going live is the beginning, not the end. Post-launch success depends on ongoing testing, user feedback, analytics monitoring, and regular updates. You should review and update your chatbot quarterly, or whenever there are significant changes to your products or FAQs.
Review conversation logs weekly Glanceia shows you every conversation visitors have with your chatbot. The questions it could not answer reveal gaps in your knowledge base. Add answers to those gaps and the chatbot improves immediately.
Track the most common questions The questions that appear most often reveal what your website is not communicating clearly. Use this data to improve your website copy, FAQ page, and product descriptions — not just the chatbot.
Update content when your business changes New service launched, pricing updated, policy changed, new location opened — update your Glanceia knowledge base at the same time you update your website. An outdated chatbot that quotes wrong pricing or mentions discontinued services actively damages trust.
Improve your welcome message if engagement is low If visitors are not clicking on the chatbot, test a more specific, more inviting opening message. Small changes in wording can meaningfully impact how many visitors choose to engage.
What a Well-Made AI Chatbot Looks Like in Practice
Here is a realistic example of what your chatbot will do once it is live and trained:
11:23 PM on a Sunday — visitor lands on your website:
Chatbot: "Hi! Questions about our services or pricing? I can answer right now."
Visitor: "Do you work with startups or just big companies?"
Chatbot: "We work with businesses of all sizes — from solopreneurs to growing startups to established companies. Most of our clients are small to mid-sized businesses looking to [your service]. Want me to tell you more about how we typically work with startups specifically?"
Visitor: "Yes, and how much does it usually cost?"
Chatbot: "For startups, we typically start with [your entry package] at [your price], which includes [inclusions]. It is designed to get you results quickly without overcommitting budget. Would you like to book a free 15-minute call to see if we are a good fit? I can take your details now."
Visitor: "Sure."
Chatbot: "Great! What is your name and best email address?"
This entire exchange — a potential customer getting specific answers at 11 PM on a Sunday and leaving their contact details — happens automatically, without you doing anything. That is what making your own AI chatbot for free actually delivers.
Common Mistakes to Avoid When Making Your Own AI Chatbot
Uploading too little content 80 percent of businesses using well-trained chatbots report answering 80 percent fewer repetitive inquiries manually.That result requires well-trained. A chatbot trained on three paragraphs gives three-paragraph-quality answers. Upload everything.
Writing vague FAQ answers "Please contact us for more information" is not an answer. Write the actual answer. Specific content produces specific chatbot responses that convert.
Not testing before going live A chatbot that gives wrong or confusing answers to the first question a visitor asks destroys trust immediately. Test thoroughly before publishing.
Ignoring the conversation logs The data your chatbot collects is one of the most valuable business insights you have access to. Visitors are telling you exactly what they want to know and what your website is not answering. Use it.
Not updating after business changes A chatbot quoting old pricing or mentioning a service you no longer offer is worse than no chatbot at all. Update the knowledge base every time something changes.
FAQ — How to Make Your Own AI Chatbot for Free
Can I really make my own AI chatbot for free? Yes — Glanceia's free plan lets you build, train, and deploy a fully functional AI chatbot on your website with no credit card required and no time limit on the free plan.
Do I need to know how to code? No. The only technical step is pasting one line of embed code into your website — a 60-second process that requires no coding knowledge. Everything else happens through a visual dashboard.
How long does it take to make my own AI chatbot? Most businesses can build and deploy a custom AI chatbot in 30 minutes with the right platform. The majority of that time is spent uploading and organising your business content, not on technical setup.
What is the difference between making a chatbot myself vs hiring someone? Making it yourself with a no-code tool like Glanceia takes 30 minutes and costs nothing. Custom development costs $15,000 to $150,000+ and takes 3 to 6 months. For most small businesses, the no-code route delivers everything they need at a fraction of the cost and time.
How do I make sure my chatbot gives accurate answers? Train it on specific, detailed business content — your real FAQ answers, actual pricing, specific policy terms. The more specific your uploaded content, the more specific and accurate the chatbot's responses. Vague content in means vague answers out.
Can I make my own AI chatbot for free and add it to WordPress, Wix, or Shopify? Yes — Glanceia works on all three platforms plus Webflow, Squarespace, Framer, and any custom-built website via a single embed script.
What happens when the chatbot cannot answer a question? Configure it to acknowledge the limit and immediately offer a useful next step — your email, WhatsApp number, or a link to book a call. Never leave a visitor with a dead end.
When should I upgrade from the free plan to a paid plan? When your conversation volume consistently exceeds the free plan's limits. Glanceia's paid plan starts at $9/month — the most affordable upgrade path for genuine AI chatbot capability in the market.
Final Thoughts
Making your own AI chatbot for free in 2026 is genuinely accessible to any business owner, regardless of technical background. The process takes under 30 minutes, costs nothing to start, and delivers results from day one — answering visitor questions after hours, capturing leads automatically, and reducing the repetitive inquiries your team currently handles manually.
The only thing that separates a chatbot that delivers results from one that sits unused is the quality of what you train it on. Take the time to write specific, detailed answers in your knowledge base — and your free AI chatbot will pay for itself many times over.
Ready to make your own AI chatbot for free right now? Start with Glanceia — no credit card needed →
Published by Laxman- Team Glanceia